WPSiTop - Multipurpose WordPress Theme Documentation
Welcome to WPSiTop WordPress Theme Documentation Page. This user manual will teach you how to set up and use the theme.Before starting, we strongly recommend that you familiarize yourself with this document file. Spending half an hour reading the manual can save you a lot of time and help you avoid questions with obvious answers.
Regular Version: https://demo.webpageseo.net/wp/wpsitop/
One Page Version: https://demo.webpageseo.net/wp/itop/
Please Note:
1) Although I have deeply optimized the theme code and images, many factors can lead to a decrease in score, such as server response time, modified CSS code, JS code, failure to optimize image quality and size, and installation of some plugins, etc. Therefore, the score of the theme passing the Google's PageSpeed Insights (https://pagespeed.web.dev) test is reduced, you can contact me for some SEO advice: https://webpageseo.net/contact/
2) If you are using an Apache server, please copy the following code to the .htaccess file in your installation directory for optimal performance:
# Enable GZIPIf you are using an Nginx server, please contact your hosting provider to set up similar file caching and file compression code. Additionally, I suggest using CloudFlare CDN.AddOutputFilterByType DEFLATE text/html text/plain text/css application/json AddOutputFilterByType DEFLATE application/javascript AddOutputFilterByType DEFLATE text/xml application/xml text/x-component AddOutputFilterByType DEFLATE application/xhtml+xml application/rss+xml application/atom+xml AddOutputFilterByType DEFLATE image/x-icon image/svg+xml application/vnd.ms-fontobject application/x-font-ttf font/opentype application/x-font-woff # Expires Headers - 1 yearExpiresActive On ExpiresDefault "access plus 1 year" ExpiresByType image/gif "access plus 1 year" ExpiresByType image/jpeg "access plus 1 year" ExpiresByType image/png "access plus 1 year" ExpiresByType image/webp "access plus 1 year" ExpiresByType text/html "access plus 1 year" ExpiresByType text/css "access plus 1 year" ExpiresByType text/javascript "access plus 1 year" ExpiresByType image/x-icon "access plus 1 year" ExpiresByType image/svg+xml "access plus 1 year"
3) Before uploading any images, it is recommended to optimize the size and quality of the images(Recommend using Photoshop to store images in webp format). Otherwise, when using the Google's PageSpeed Insights to detect pages, the page's detection score may decrease.
Logo Size: 68 x 68 pixels, Home Banner Size: 1500 x 900 pixels, Sub Page Banner Size: 1500 x 370 pixels, The maximum width of the blog's detailed page image is 650 pixels.
4) Our support includes an explanation of the installation process, how to use the theme features, and assistance in fixing any issues that may arise with the theme's default functionality. But we do not provide deep customization of themes or customization of third-party plugins. If you want to add additional features to your theme and modify its appearance in a complex way, in this case, hire a third-party developer who has a deep understanding of HTML/CSS, PHP, and JavaScript.
WordPress Installation
This theme requires a working version of WordPress to be installed on your server. You should always run the latest version of WordPress. If you need to install WordPress then please visit: https://wordpress.org/download/. If you need any help with the installation , please refer to this guide: https://codex.wordpress.org/Installing_WordPress.
Here is a brief step by step on how to install WordPress:
1. Download and unzip the WordPress package if you haven't already.
2. Create a database for WordPress on your web server, as well as a MySQL user who has all privileges for accessing and modifying it.
3. Upload the WordPress files in the desired location on your web server:
3.1 If you want to integrate WordPress into the root of your domain (e.g. https://example.com/), move or upload all contents of the unzipped WordPress directory (but excluding the directory itself) into the root directory of your web server.
3.2 If you want to have your WordPress installation in its own subdirectory on your web site (e.g. https://example.com/blog/), create the blog directory on your server and upload WordPress to the directory via FTP. Note: If your FTP client has an option to convert file names to lower case, make sure it's disabled.
4. Run the WordPress installation script by accessing wp-admin/install.php in a web browser.
4.1 If you installed WordPress in the root directory, you should visit: https://example.com/wp-admin/install.php
4.2 If you installed WordPress in its own subdirectory called blog, for example, you should visit: https://example.com/blog/wp-admin/install.php
Theme Installation
Theme requirements: WordPress 6.8 or higher, PHP 8.0 or higher, MySQL 5 or higher, Memory Limit 128M or higher. Please make sure to meet the requirements.
You can install the theme by using one of two installation methods:
1. WordPress upload
Step 1: Log into your WordPress admin.
Step 2: Go to Admin Panel -> Appearance -> Themes-> Add New-> Upload Theme.
Step 3: Browse to file wpsitop.zip and click Install Now button to install.
Step 4: After the theme is installed, activate it by clicking the "Activate" link.
2. FTP upload
Step 1: Upload non-zipped theme folder called wpsitop to /wp-content/themes/ folder in your WordPress installation folder on your server.
Step 2: Go to Admin Panel-> Appearance -> Themes, locate the theme and click Activate button to activate the theme.
Step 3: Please change permalink setting to post name.
Plugins Installation
Plugin installation steps:
1) After installing and activating the theme, you will see a notification box prompting you to install the required and recommended plugins, Clicking the "Begin installing plugins" link.
2) Select all the plugins, choose the "Install" option from the bulk actions dropdown, and click "Apply".
3) After successfully completing the plugin installation, click on "Return to Required Plugins Installer".
4) Select all the plugins, choose the "Activate" option from the bulk actions dropdown, and click "Apply" to activate them.
Demo Data Import (Optional)
From Admin menu, navigate to Tools->Import , Select the "WordPress" and run the importer(It will ask you to install the importer before if this is your first time). In the next step when file uploading option appears, select the regular-version-wpsitop.xml OR one-page-version-wpsitop.xml file from demo-data folder and start uploading. In next step select the checkbox saying "Download and import file attachments" and click on "Submit". Then it'll start uploading contents.
Next, go to Settings Menu -> Click to Reading Settings -> check the Your homepage displays -> select "A static page"
Set up Menus
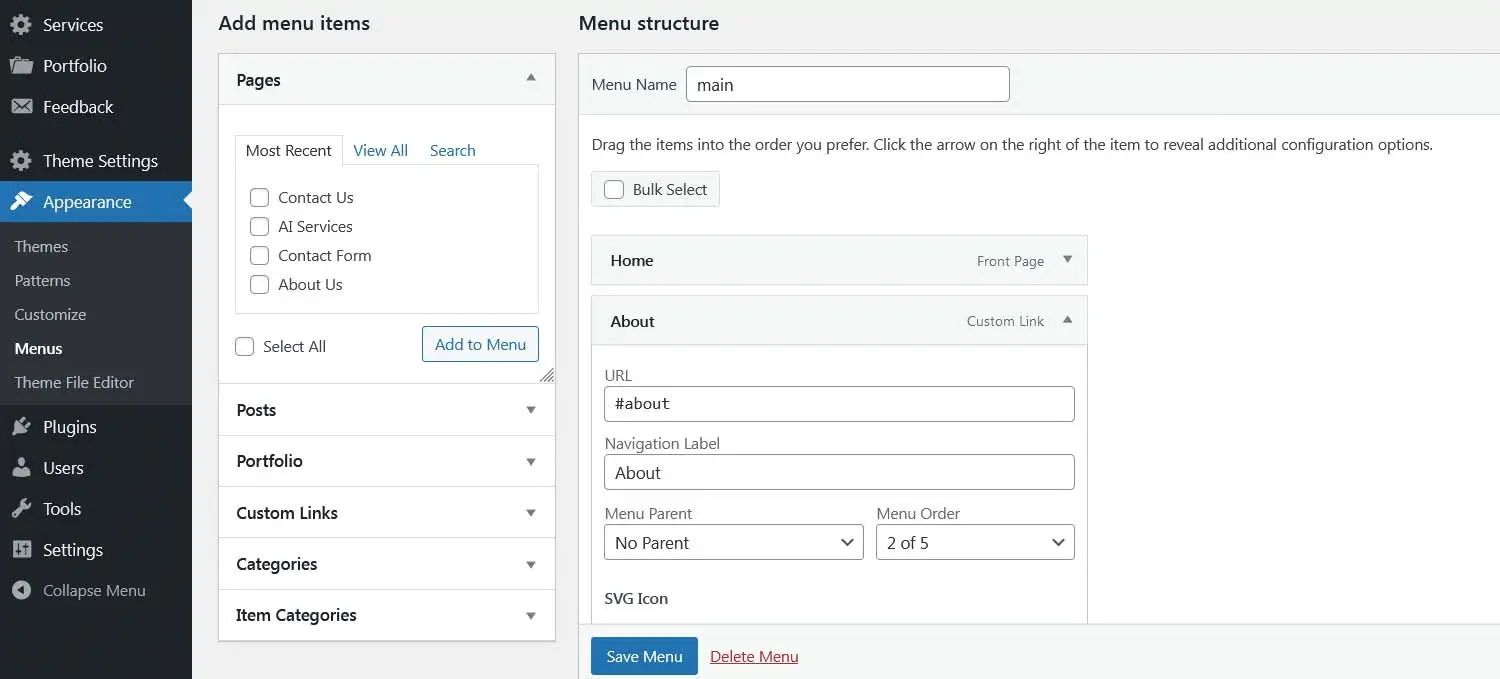
To set up menu, please go on Appearance -> Menus -> view the Menu Settings, for the "Display location", select the "Main Menu", Then click on each menu to select the desired small icon, All done, click the "Save Menu" button.
Please note:
1) If you plan to use one page mode, do not modify the URL in the menu that start with a # symbol, You can modify the menu Label.
2) Because the main menu uses animation, the number of main menus is fixed at 5. Please do not increase or decrease the number of menus. But you can set multiple submenus without any restrictions, but it is recommended to set a maximum of 6 submenus.
Header and Footer
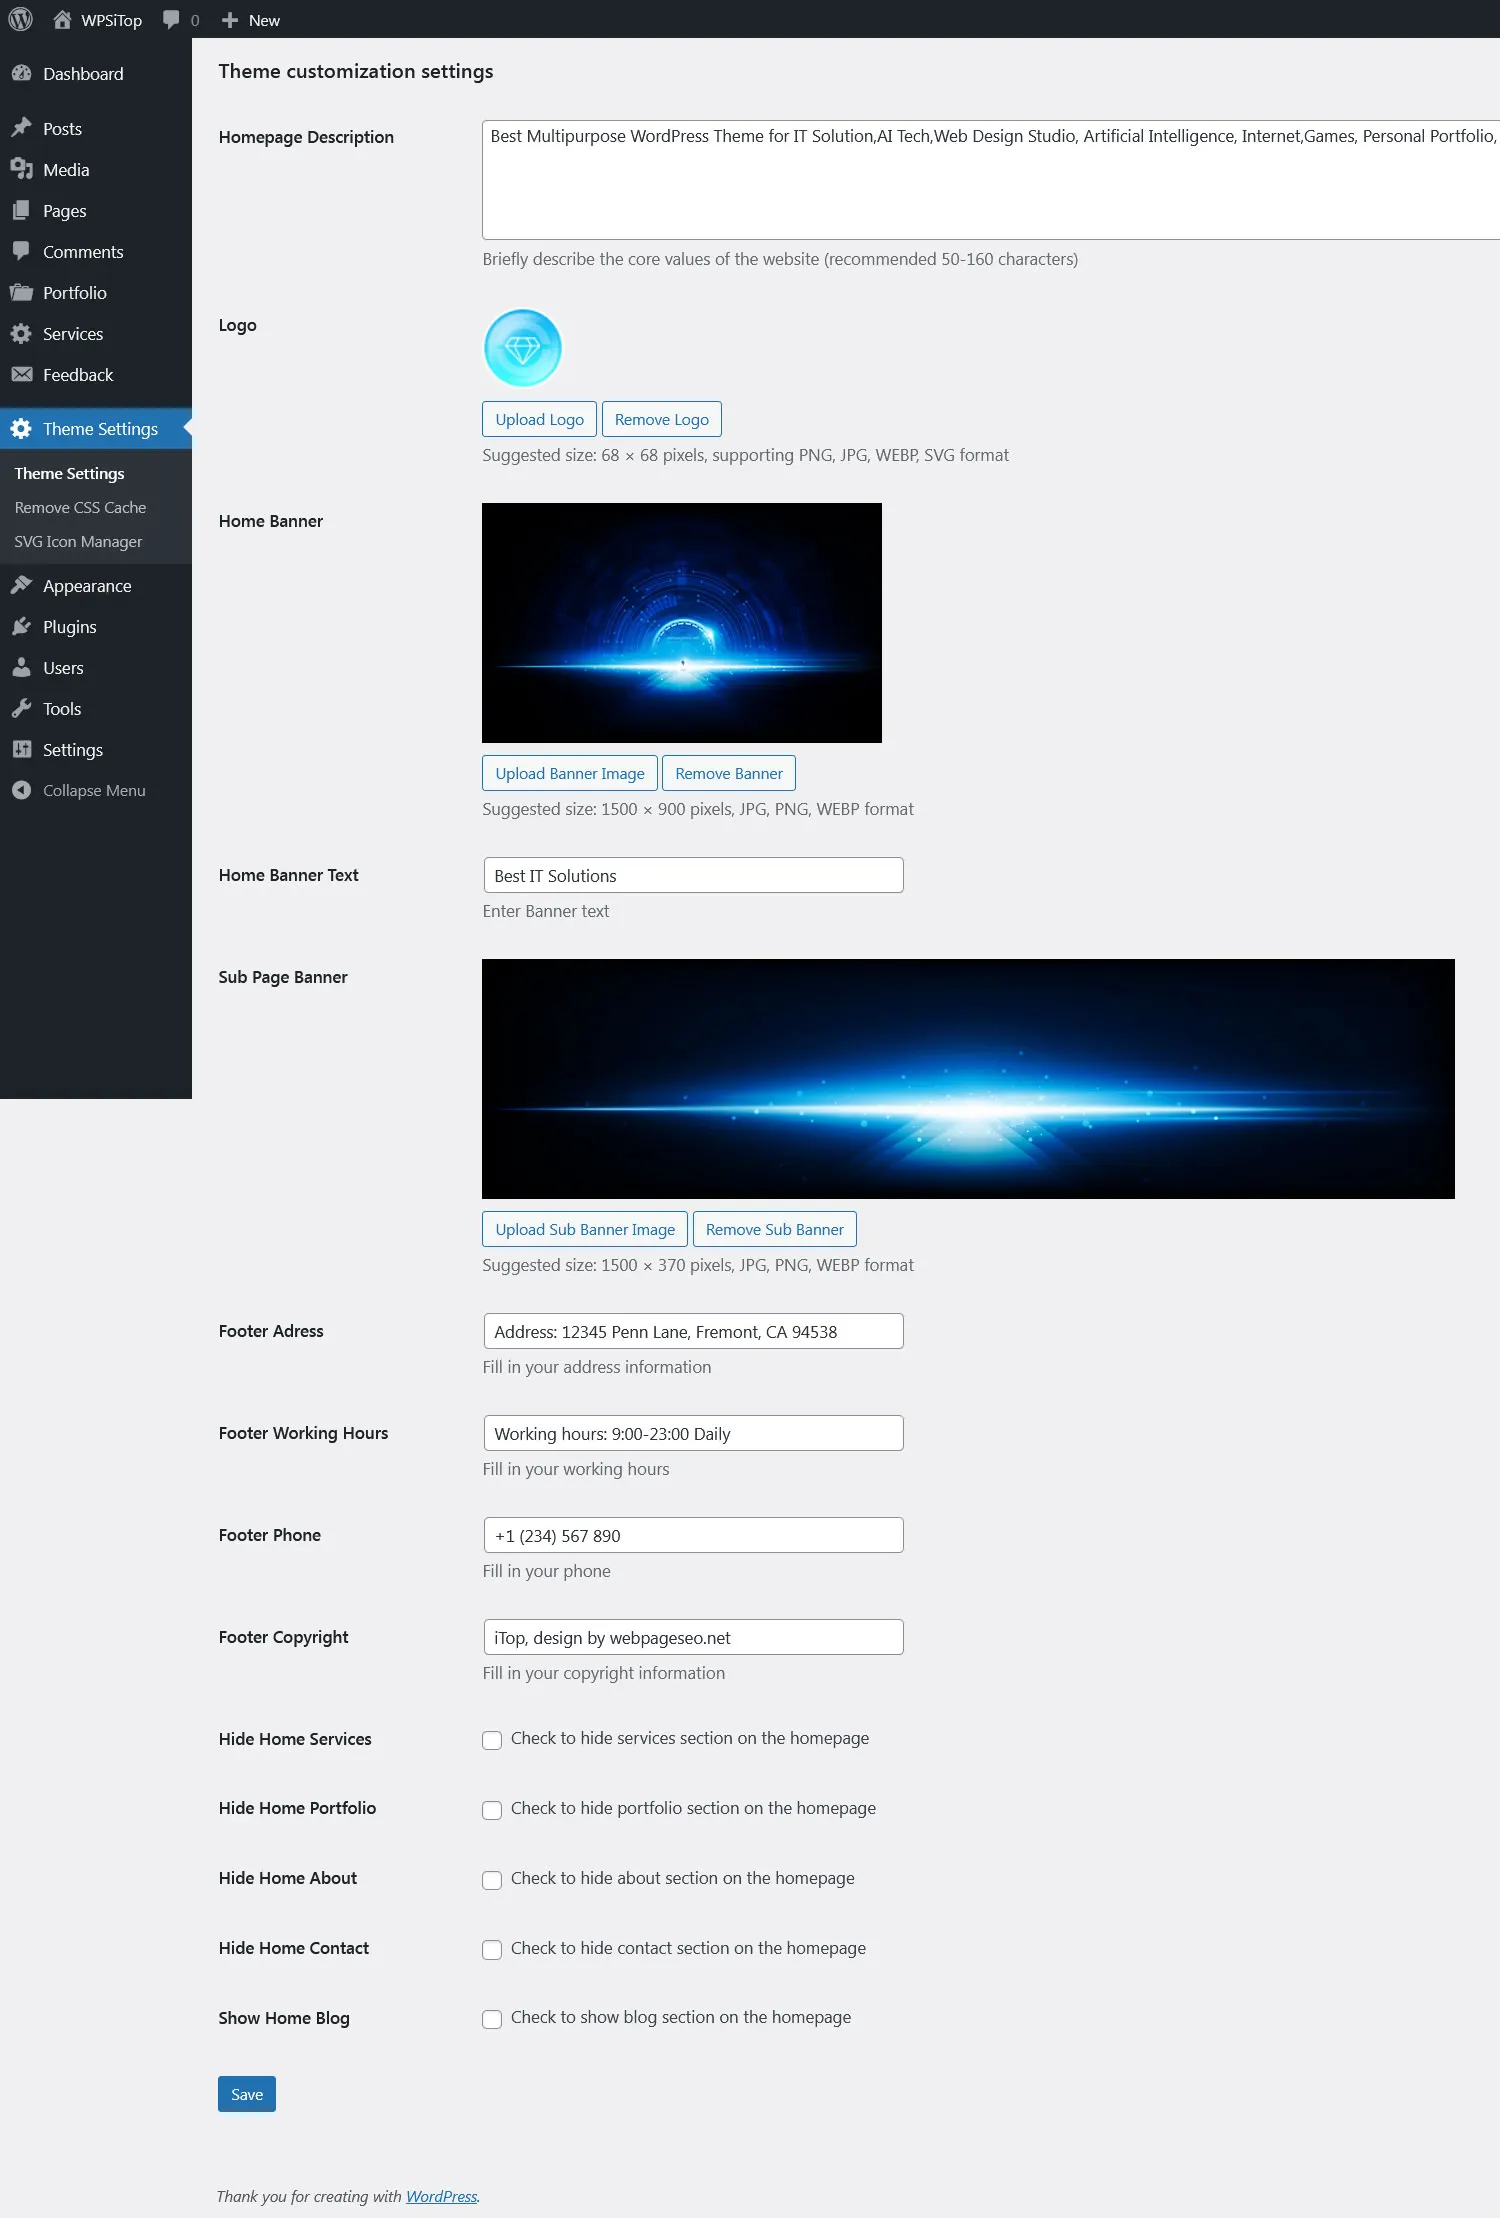
Login to your WordPress Admin panel -> Left Menu "Theme Settings", Here, you can set the header and footer information, including Logo, banner images, show OR hide the home page some sections. It is strongly recommended to use images with edge feathering for a more harmonious overall look.
Please note: To add site icon, Left menu "Settings" -> General
Services Section
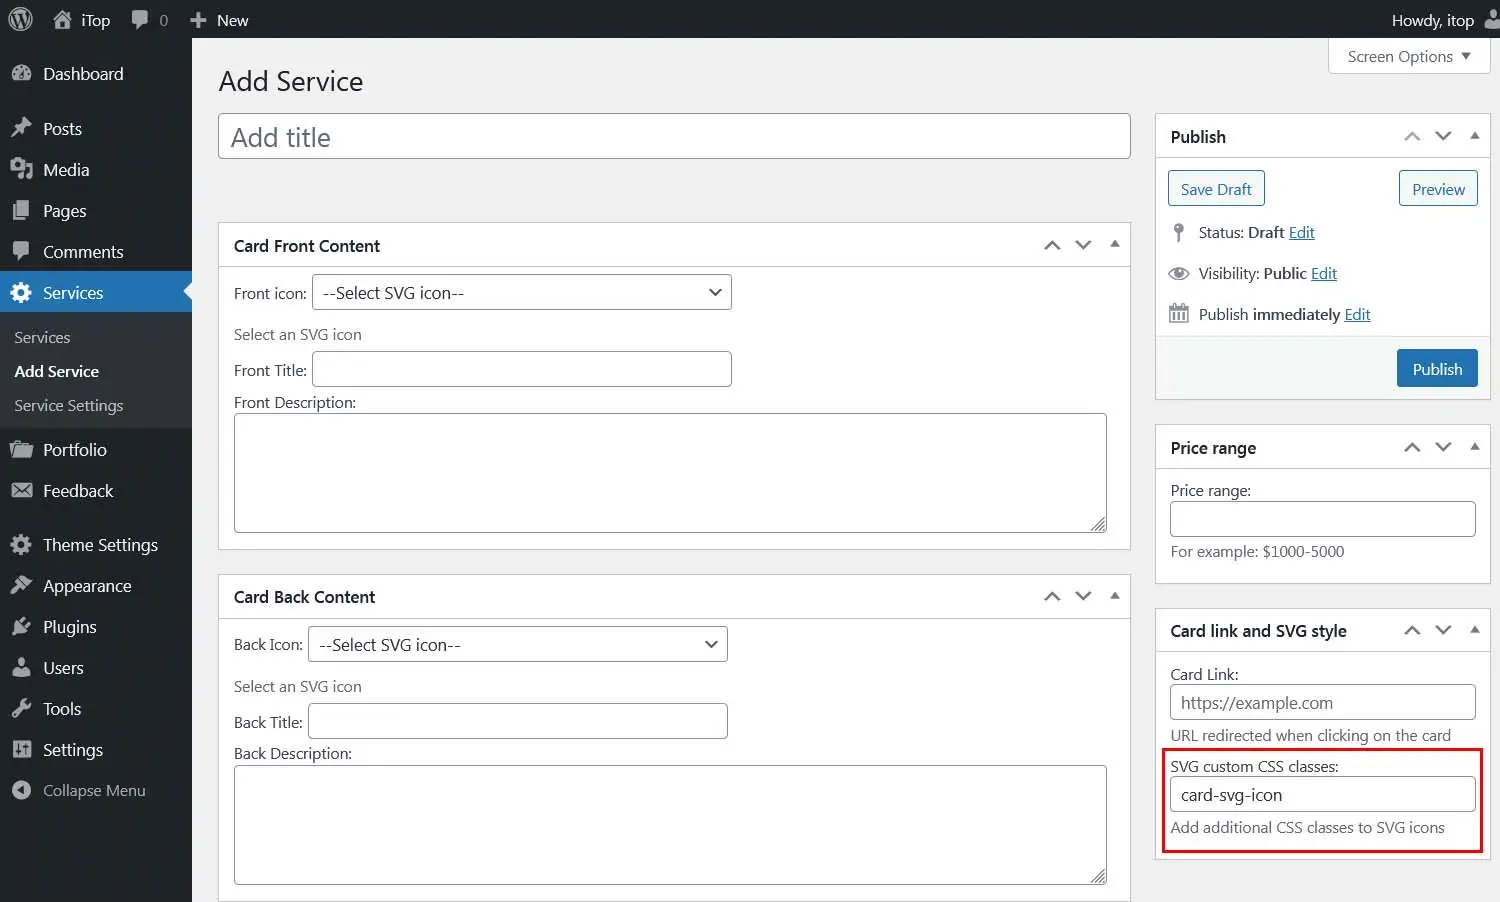
In this section, you can view the service list, edit service, add service, and set service. In the "Service Settings" menu, you can change the title of the service section and the number of displayed items.
Please note, for add a service:
1) Please note to keep the default value of the "SVG custom CSS classes" input box and do not modify it. Please refer to the red mark in the screenshot below.
2) For Card Link, you can add the "#contact" to link to the contact form, or create a new page, link to new page.
Portfolio Section
In this section, you can view the "Portfolio" list, edit Portfolio, add Portfolio, and set Portfolio, Manage the Item Categories. In the "Portfolio Settings" menu, you can change the title of the service section and the number of displayed items.
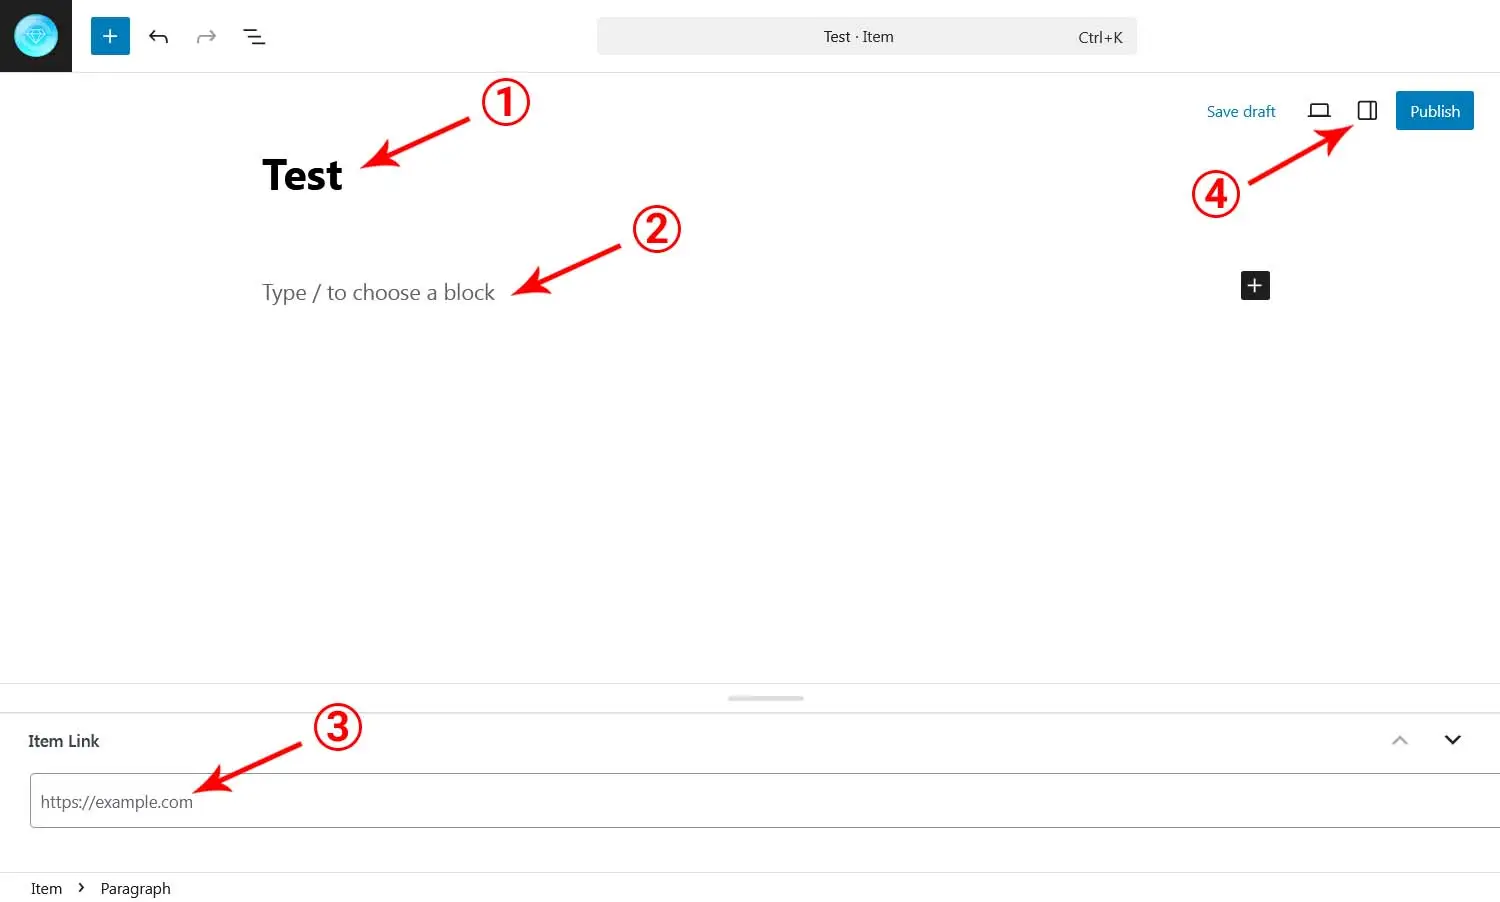
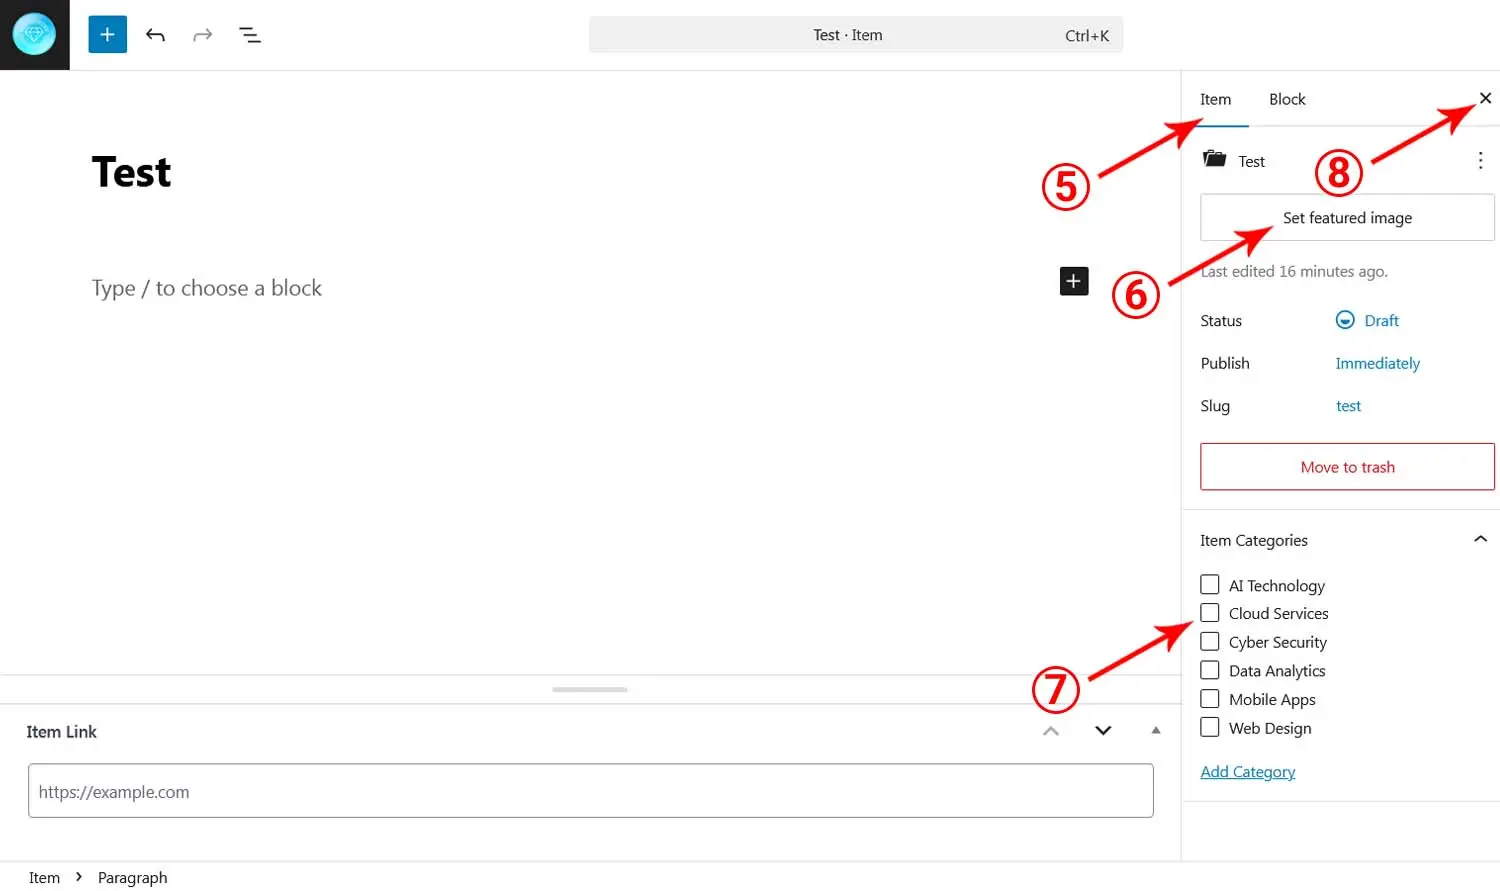
Regarding adding a portfolio, please refer to the two screenshots below. After filling it out, click the "publish" button in the upper right corner.
Please note, for add a Portfolio:
1) In step 3, if the input box is left empty, the default link will be used. You can customize the link and enter any link.
2) Left menu "Portfolio" -> Portfolio Settings -> Links Setting -> Select the "Disable item links", After activation, all item card will not be clickable and will only be used for display purposes.
Feedback from Contact Form
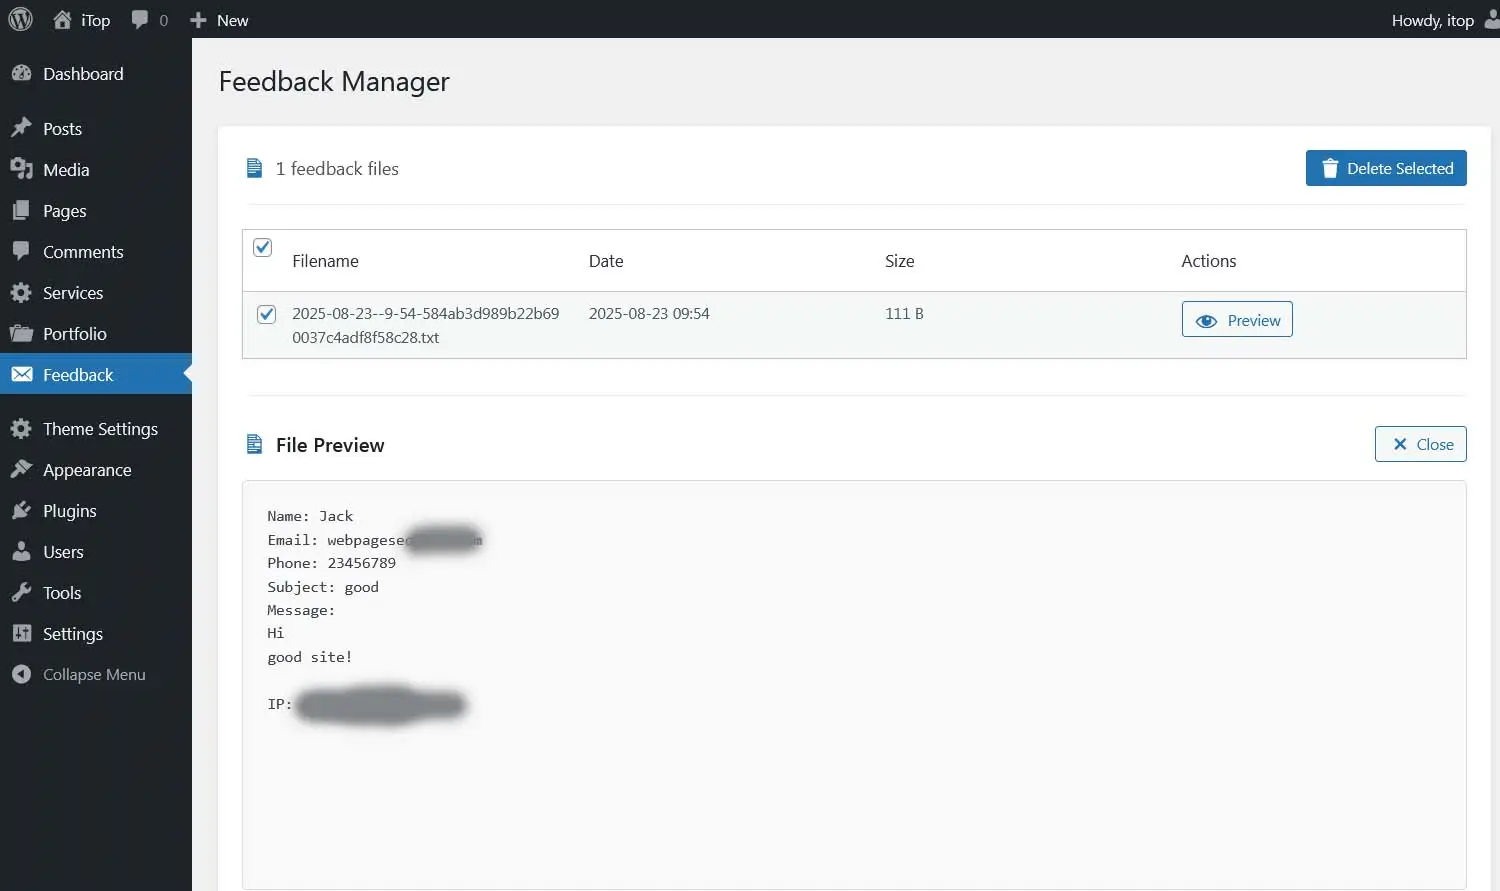
Because many hosts are unable to send contact forms or Customer information are blocked by email systems, we have designed this feedback management system so that you can receive all customer feedback. You can log in to your email to reply to important messages. In this section, you can view and delete information. In addition, for safety and to avoid frequent sending of spam messages, we have designed some security measures, and the same IP can only send messages once per minute.
About Us
For modifying the content About Us section on the homepage, Please login to WordPress Admin Panel -> Click The Left Menu "Pages" -> About Us
Blog
If you use one page mode, the blog module will not be displayed on the homepage by default, Please login to WordPress Admin Panel -> Theme Settings -> Theme Settings, You can select the "Show Home Blog"
The maximum width of the blog's detailed page image is 650 pixels, So it is strongly recommended to upload images with a width of less than or equal to 650 pixels.
Theme Settings
In the Theme Settings section, Contains three menus: Theme Settings, Remove CSS Cache, SVG Icon Manager.
"Theme Settings" menu: we have already introduced the ability to modify information in the header and footer areas.
"Remove CSS Cache" menu: If you modify the CSS file, you need to click the remove button to clear all CSS caches. If you modify the CSS code at this location (Appearance -> Customize -> Additional CSS), you do not need to clear the CSS cache.
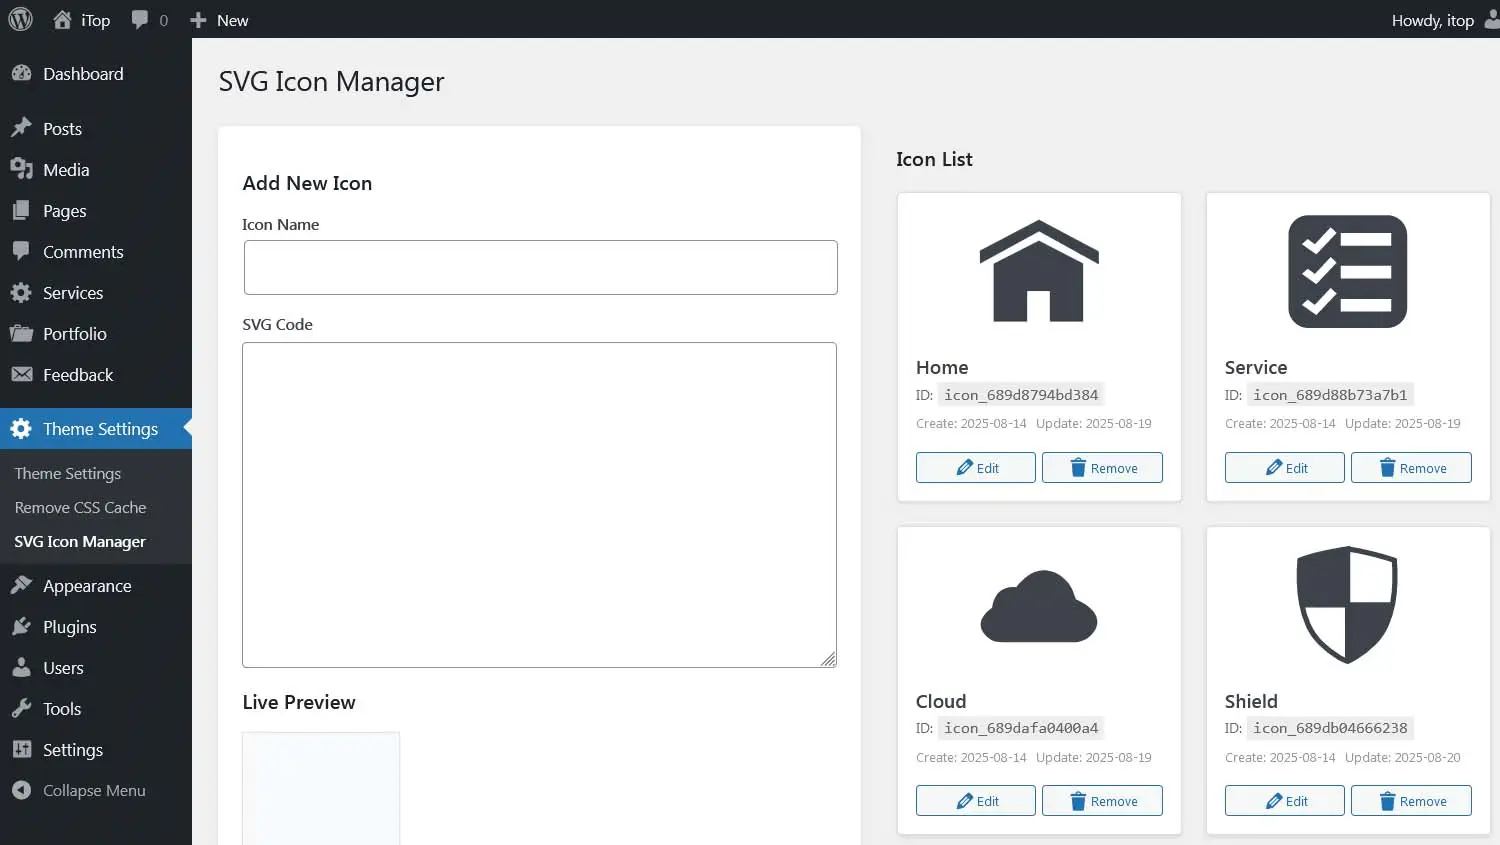
"SVG Icon Manager" menu: You can add SVG code so that your menus or/and items can use icons. For optimal performance, we recommend adding only necessary icons. The existing icons were designed by me. If you need more icons, you can go to this website and use free icons according to their usage rules.
Go to https://fontawesome.com/v5/search?ic=free&o=r, Select an icon, click it, In the pop-up dialog box, click on the SVG tag, and then click on the SVG code to complete the copy, Then paste the code into the input box of the SVG Code screenshot below, fill in the Icon Name input box, and click the Add button to complete the addition. Of course, you can also add SVG Icons Code of your own design.
Sources
If you need assistance with image processing, please feel free to contact us at any time